|
COMPREHENSIVE 3D PHOTOGRAPHY COURSE – JULY 7-AUGUST 25, 2010 Thank you for signing up for this eight-week course which will take you on an exciting journey through the world of 3D imaging. Notice that I say “3D imaging” rather than 3D photography, and indeed, “3D imaging” is the correct term since many 3D images are not necessarily photographs. Throughout the course, I will be using the terms “3D” and “stereoscopic” or simply “stereo” interchangeably and for our purposes this will mean the same thing: two-dimensional images on paper or on the screen which when viewed in a certain way (for example with a viewer or special glasses) look like a true 3-Dimensional object in the real world. The ability of our eyes and brain to process the information from two separate images and to give us the illusion that we are looking at the real object in 3D is indeed amazing. During these 8 weeks, we will examine many topics, all of which I have taught here at the 3D Center in the last 6 years. Some will be easier than others, but each topic is exciting and useful in making 3D images. Each Wednesday class will last about 2.5 hours, from 7 until about 9:30 pm. This will amount to a total of 20 contact hours. However, I am not under the illusion that it is possible to convey the vast amount of information during 20 hours in class, no matter how good of a teacher I might be or how brilliant a student you are. The only way to assure that you retain and understand the information is to devote at least the same number of hours outside of class time, so you can practice what we learn in class. Ultimately, it is up to you to decide how much time you wish to devote doing so. After each session, I will be assigning “home work”. I strongly believe that home assignments are the best way to understand and retain information. Like any form of photography, anything in this course will start with an image – or two to be more precise, one for the left eye and one for the right. Unless you have a digital stereo camera, I will assume that all of your stereo photography will be done with a single digital camera. Although I personally have several digital systems comprised of two cameras, I use frequently a single camera to take two pictures in sequence to obtain the left and right images I will need later. I will explain in detail in class how and why this way of doing stereo is useful and many times preferable. Unlike the days of film photography, in addition to a digital camera, stereo digital photography requires a computer equipped with some image editing software. The main application that I will be using in class is Photoshop. I don’t assume that each of you will have or will buy Photoshop for this class since a license for the latest version of Photoshop (CS5) is around $650 or more. For that reason, I will provide you with information on two completely free programs that you can use or options to obtain a full fledged and legal version of Photoshop for much less money than full price. Furthermore, since the class is designed for beginners, I will not assume that you know how to use any of these programs. Here is what do you need for this course in addition to a digital camera: Minimum required equipment:
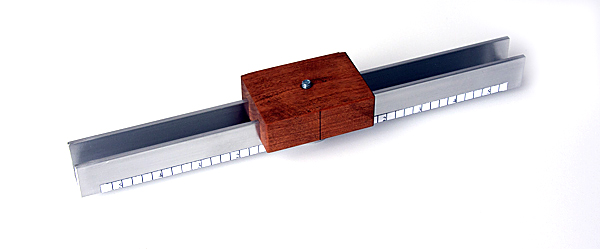
I know that a decision to come to 8 consecutive Wednesdays is not an easy commitment and I will understand if you may have to miss one session. If this must happen, I will make it possible for you to meet me individually so I can summarize what you have missed in class. I am committed to help you anytime you wish, outside of class, even if you have not missed a class. Do not hesitate to call me at home: 503-977-9876 or to write to me with any questions or concerns you might have about the course: shablevy@comcast.net We will start all classes punctually at 7 pm. For the first class you need only pen and paper to take notes, or a laptop if this is your style. See you all on Wednesday, July 7th at 7 pm at the 3D Center: 1928 NW Lovejoy St, Portland, OR 97209. If you need to make a last moment change, call my cell phone: 503-314-9521 or call the 3D Center at 503-227-6667. IMPORTANT: PLEASE REPLY TO THIS EMAIL TO MAKE SURE I HAVE YOUR CORRECT EMAIL FOR FUTURE DETAILS. SOURCES FOR SLIDE BARS Unless you have a stereo rig composed of two cameras or the like, you will need a slide bar to take all of your pictures with a single camera. A slide bar is a simple tool used in stereoscopic photography for use with a single camera. The camera is attached on the wooden block with a standard bolt and the aluminum bar is attached to the tripod with provided thread at the bottom. One picture is taken then the camera on the wooden block is shifted to one side and a second picture is taken again of the same object. The slide bar keeps the camera precisely parallel and horizontal between shots. A 12” professional model cost around $100 plus shipping looks like this:
You can get it from: http://www.berezin.com/3d/slidebars.htm Or you can get a much simpler one that works the same way directly from me for only $35 and it looks like this:
I will have some of these with me during the first class and you can buy it if you wish, or buy the professional model.
Shab Levy
|

